


Sequoyah National Golf Club: 18 Holes of Stunning Mountain Golf
- travelinggibson

- Apr 16, 2023
- 14 min read
Updated: Jun 4, 2023
This stunning mountain course is a Par 72 Robert Trent Jones II design that provides an incredibly scenic and challenging round of golf just a 6 minute drive from Harrah's Cherokee Casino. This course showcases the beauty of The Great Smoky Mountains and is the epitome of mountain golf.

Sequoyah National Golf Course was built in 2009 and went through a renovation focusing on the regrassing and bunkers in the summer of 2020. Each hole has a 180 degree panoramic view of the surrounding mountains and the golf carts will take you up and down some steep paths between holes. The elevated tee boxes offer the most beautiful views while also presenting the most accessible birdie opportunities while also demanding fairway precision with some unforgiving O.B. drop offs just beyond the rough.
This course has 5 tees to play from with overall distance changing occasionally on the scorecard. This by no means is an incredibly long course, but the challenges of navigating tight turns and plenty of blind tee shots does more than enough to challenge short and long hitters alike. The most recent distances offered on a scorecard were:
Black Tees- 6,502 Yards
Gold Tees- 6,126 Yards
Silver Tees- 5,726 Yards
Bronze Tees- 5,281 Yards
Jade Tees- 4,570 Yards
This course ranges in price depending on the season from $75-$120/round (golf cart included) and it is worth the price simply for the views alone.
Driving Range- The Best View to Warm up

Once you arrive at the parking lot and drop your bags off, you will go inside to the pro shop to pay for your round and get any necessary information about the course and how it is playing. After that you will be introduced to, in my personal opinion, the most beautiful view for a driving range. For the time being as I write this in 2023, the driving range does not accommodate drivers due to distance issues but I have heard there are plans to extend it in the future to allow for that.

You have an option to hit irons only off of mats that are covered just outside the pro shop, any club excluding the driver from the grass spots, a putting green, chipping area including a bunker, and another putting green that is right before the first tee.

Hole #1 - Creation (Par 5)

After warming up on the driving range or putting greens, you head over to the first tee box and are greeted with an absolute stunner of an opening hole.
Hole 1 is a Par 5 dogleg right that measures 497 yards from the Silver Tee. It offers a great risk/reward option for your first shot. You have plenty of fairway to work with to the left of the bunker that sits roughly 250 yards from the tee box (elevated tee box will provide longer distance). The left option almost certainly guarantees that the hole becomes a 3 shot hole to reach the green.
The aggressive option that opens up the possibility to reach the green in 2 is to play to the right of the bunker and try to carry it about 280. The issue with this option is that the fairway narrows just after that point and to the left is a drop where the ball will be lost and to the right is a hill with thick grass that is incredibly difficult to hit out of if you can even find your ball.


The green is multi-tiered, but is not incredibly difficult to putt on, but can be a challenge to hit on your second or 3rd shot and if you miss it to the left, your ball will be gone.
Hole #2 - Hornet Place (Par 3)

Hole 2 is a Par 3 that measures 133 yards from the Silver Tee and its design brings to mind the 12th hole at Augusta in basic layout. Instead of hitting over Rae's Creek you will hit over a deep gorge, and the green is long but not deep. You absolutely want to carry the gorge but if you're not careful, you will end up deep in the trees behind. Playing at an elevation compared to playing at sea level presents that extra challenge of getting your distance dialed in to hit this green.

"Golf is about how well you accept, respond to, and score with your misses much more so than it is a game of your perfect shots." – Br Bob Rotella

Hole #3 - Thunder ( Par 5)

After a steep climb up a hill on your golf cart, you are greeted with an incredible view overlooking a variety of holes that you will soon get to experience first hand.
Hole 3 is a 452 Yard Par 5 dogleg right from the Silver Tee. This is most certainly one of my favorite holes on the course and with the steep elevation change on the fairway has the potential to be taken on. The fairway is can be quite tight with the dogleg in play but with a solid drive, can be aggressively played. Left or right of the fairway and you will be hitting another ball because of drop offs into the woods. You have the chance to smash a drive over the right edge of the right trees on a blind shot which should take you far down the fairway where you should have a wedge shot in. The smarter shot is to take a fairway wood and put one down where it should still roll out some but will result in a longer iron into the green.


The green is protected by bunkers in front and to the side. Right of the green is dead and your ball will be lost off a cliff drop so you want to keep it left where there is a funnel area if you do miss, you will be left with a chip instead of a drop.

This hole offers a great opportunity for Eagle or Birdie, but with the tight fairways and unforgiving cliffs beside the fairways, can also turn into bogeys very quickly.
Hole #4 - The Healing Forest (Par 4)

The first Par 4 of the course is 264 yards and incredibly uphill from the Silver Tee, so plays much longer than that distance. Similar to many of the holes around this course, if you end up left of the fairway, your ball will be unplayable. You have a lot of room on the right to work with on the fairway, and most of the time, you won't be able to bring the bunkers into play unless you absolutely smash a long drive down there. Your second shot will be into a very elevated green but you do have a hill behind the green as a backstop to prevent it from being lost (although that will lead to an incredibly difficult chip depending on hole location that day).

Hole #5 - Little People (Par 4)

The 5th hole is a 319 yard Par 4 from the Silver Tee and could be considered a drivable Par 4 if you're willing to take a risk of possibly ending up long and or left. To go for the green off the drive would be preferable to a player that hits a slight draw (once again, dead is left in the trees, although if you hit it far enough, you can clear those trees on the left and land right by the green). If you choose not to go for the big shot, you can still hug the left a little to shorten your second shot, but there is plenty of room on the right to bail out to down there.

This hole is definitely a birdie hole if you play slightly aggressive, but can at least provide a straightforward par.
Hole #6 - Water Spider (Par 3)

The 6th hole is second Par 3 of the front 9 and plays 185 yards from the Silver Tees. The shape of this Par 3 presents an obvious challenge of carrying water the entire way to the green (although there is a bail out along the right). Carrying the water at that distance is the most difficult part of this hole, once you are up near the green either putting or chilling, it is a straightforward green.

Hole #7 - Stekoa (Par 4)

The 7th hole is a Par 4 344 yard dogleg left from the Silver Tee. The best strategy is to either draw it off of the two bunkers on the right to play the hole shape, or you can play a fade just to the left or over the bunker on the left and place it right onto the fairway for a good second shot in.

Hitting your second shot should be straightforward if you hit the fairway. Chipping and putting is once again not incredibly hard, but the green is large and some hole placements could mean longer putts than you'd like.

Hole #8 - Kingfisher (Par 3)

The 3rd and final Par 3 of the front 9 is a deceptive little hole. The scorecard lists it as 134 yards from the Silver Tees but I have found that to be relatively inaccurate when playing it. The green is fairly narrow in width but quite long with a 40 yard difference from front to back, so depending on the flag placement that day the yardage could be anywhere from 146 yards to 186 yards.
(Coming up short is better than going long on this hole, but it can be very demoralizing to see a supposedly short hole and come up way short on it.)

Hole #9 - Journey of the Sun (Par 5)

The final hole of the front 9 is the 3rd Par 5 which plays as a 411 yard dogleg right from the Silver Tee. This tee is a blind shot at the dogleg so can be attacked by playing a nice cut to the left of the closest visible bunker which should cut into the distance allowing for a chance to go for the green in 2, or could be approached as a 3 shot Par 5 with the goal of just reaching the fairway straight ahead and avoiding the many hazards to the right of this fairway (which slopes towards the hazard on the right).
Like a lot of the other greens, it is multileveled and can be difficult to handle depending on the flag location. Coming up short for a straight on chip would be much easier than left on the hill above the green, or right which is below the green.

There is no halfway house or turn by the clubhouse as you move to the back 9. You simply make a turn and continue playing onto the back 9 (so if you needed any drinks or food, fill up before your round begins).
Hole #10 - Fire's Relative (Par 4)

This Par 4 is a tough hole to play. It is fairly long, playing at 390 yards from the Silver Tees, but it's not the distance that makes it tough. Hitting the fairway, already at a premium on this course, is an absolute must on this hole. The left gives you some wiggle room because it leads to the 9th hole fairway, but if you loose it into the hill on the right, that grass is going to swallow up the ball and will almost certainly be lost in the thick stuff.
Even if you hit the fairway, you're left with a second shot that must reach a very elevated green with a short shot being punished and a long shot possibly getting lost in the thick stuff on the hill behind the green.


Getting enough height on your ball on your approach shot so that it will stick, if you aren't incredibly talented at getting the ball to spin hard, is difficult with the elevated green.
This is not a scoring hole, this is a survive and try to avoid a massive blowup hole.

Hole #11 - Long Man (Par 5)

Following a tough hole is the next to last Par 5 on the course and it most definitely is a hole that you can make up some ground if you lost some shots on the previous hole. From the Silver Tees you are looking at 484 yards and if you can hit a nice high shot or a lower runner, you're going to get it down far enough that you're second shot should be a wedge or at least a short iron in.
If you don't catch it all the way or the conditions are more wet so that you have a longer shot in, a lay up may be the smart option simply because the green is fairly small and you have to cover a deep creek that is strategically placed in front of the green.
On top of that, there is a bunker both in front of and behind the green (although they are actually pretty simple bunker shots).

One more thing to be aware of is that there is a water hazard along the left, so the continuing theme is that there is not a ton of forgiveness if you miss the fairway by more than a little. This is still a good scoring hole if you can keep the ball in play.

Hole #12 - Trail of Tears (Par 5)

Now you go from a very scoreable Par 5 to the most difficult Par 5 and second most difficult hole on the course with a Handicap index of 2. This hole is an absolute behemoth and will take most golfers 3 long shots at least to reach the green.
It measures at 524 yards off the Silver Tee and is completely uphill so plays at much further than that. You can absolutely rip a drive down the middle and once you reach your ball, you will be questioning your length off the tee.

You will almost certainly be taking a minimum of 3 full shots to reach this green, and with it being elevated with the uphill, you have a high chance of having to pitch your 4th shot onto a relatively difficult green.
You want to avoid losing your all to the right, and the bunker in front of the green is not easy to get out of and keep it on the correct level of green that the flag may be on. This is another hole that you hope to get out with a par if you can, but the main goal is to not drop a bunch of shots.

Hole #13 - Thomas Valley ( Par 3)

The Par 3 13th hole is without a doubt the most scenic Par 3 on the course and also plays as the longest of the par 3's as well. From the elevated tee box you will be playing 198 yards from the Silver Tee on the scorecard but could be anywhere from 216 yards to 254 yards. With the elevation you will be playing a shorter club than what the yardage would have you think, which is good because you will need some control of the ball coming into this green.
Left is almost always dead but with a bit of luck, you could always hit a miracle shot from the thick stuff if you can find your ball, although it is a blind shot off the side of a hill onto the green from there.
To the right the green is guarded by a series of bunkers which can be cleanly hit but the risk of flying over the green over the side of the hill could cause issues.
The green itself can play easier if the flag is further back, but if the flag is at the front you must be careful of putting back down the green from the back.

Hole #14 - Stronghold (Par 4)

Once you reach the Par 4 14th hole, handicap index wise, you are at the easiest section of the course with the exception of hole 17. This hole plays as the easiest handicap index on the course and measures 314 yards from the Silver Tee. This short Par 4 does play longer than that yardage states because of it being entirely uphill but as long as you put a tee shot onto the fairway short of the first bunker, you will have a nice short club in hand for your second shot.
The green is surrounded left, middle, and right by bunkers and has a hill behind to hopefully push the ball back towards the green if you go long.

Hole #15 - Mulberry Place (Par 4)
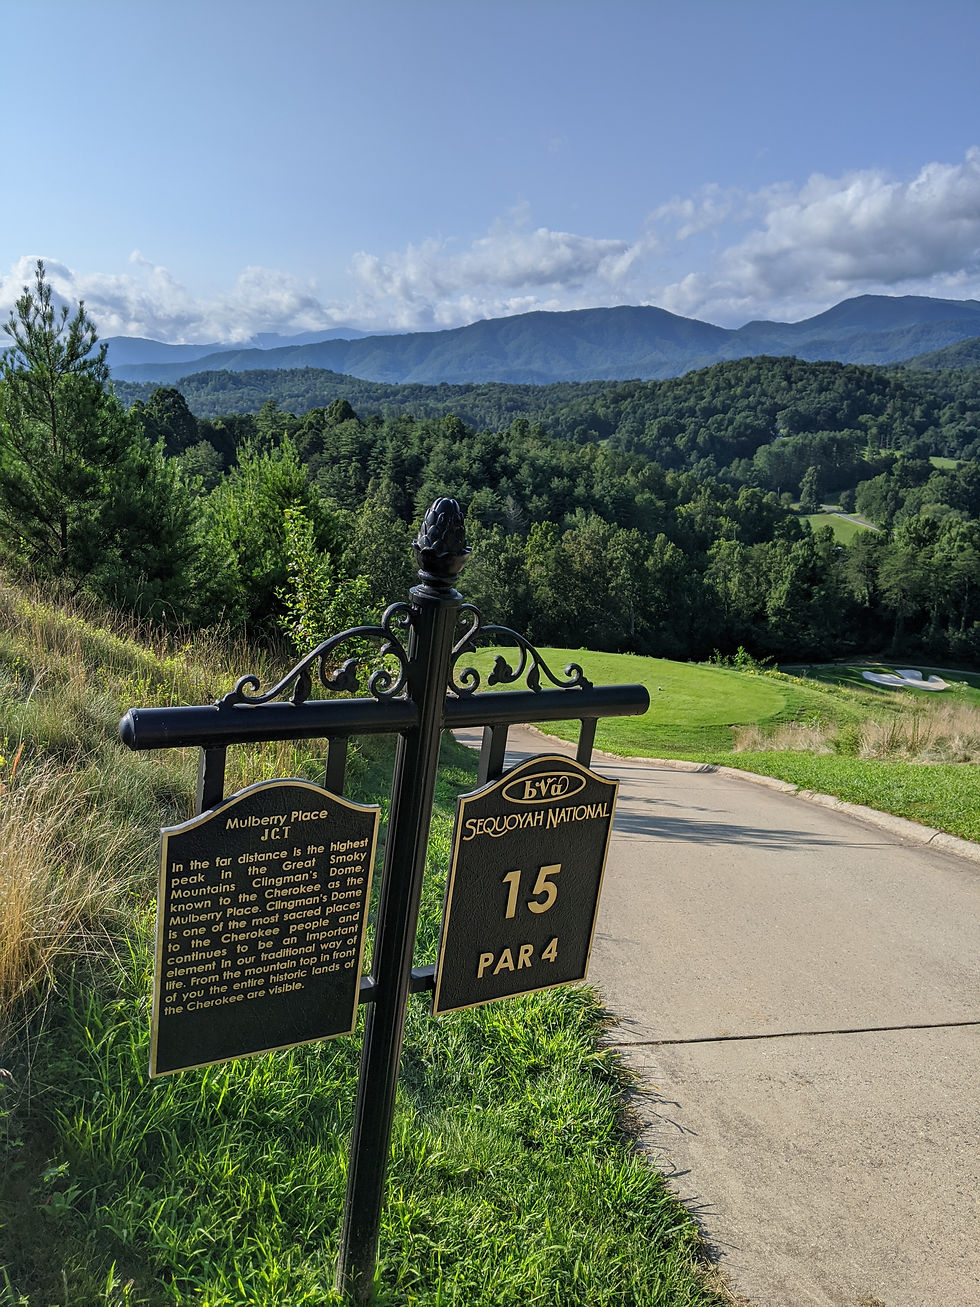
The Par 4 15th hole might just be my personal favorite hole on this course. It has an absolute stunning view from the ridiculously elevated tee boxes and allows you to really soak in the scenery like no other. This hole plays 345 yards from the Silver Tee but if you are a fader of the ball, can almost play this like a Par 3 or simply play it like the short Par 4 that it is.

If you plan to play it like a short Par 4, then you will be pulling out a club around the length of a 7 iron and just aiming to fade it onto the fairway in between the 2 visible bunkers. This will leave you with a sensible wedge shot in which you can hopefully control due to the rather small size of the green surrounded by drop offs that are tough to play from if not impossible.

The more adventurous and possibly highlight worthy choice is to go with a slightly longer club, possibly a 5 iron or even a hybrid, and take a nice fade shot directly past the left side of the right trees and let it either roll down the hill to the green, or even carry itself possibly onto the green for a fantastic feeling.
Like I mentioned above, the green does have dangerous fall offs on the right side leading up to it as well as around the green itself, so left is definitely friendlier than right is on this shot.

Hole #16 - Selu (Par 4)

For the Par 4 16th hole you have turned away from the mountain and it is a relatively flat hole and with an ever so slight dogleg left but overall is a straight shot. It plays 299 Yards from the Silver Tee so if you put a drive out onto the fairway, you can have a fairly easy second shot to go at the flag to get a birdie or easy par.
This might even be a hole that you take less than driver as well so as to not bring the bunker on the left into play at 250 yards. With the distance much shorter on this hole and no major elevation change, accuracy is more important than distance off this tee, although if you can stay clear of the bunker on the left while not falling into the trees on the right, you will have a simple pitch onto the green depending on your driving length.

Hole #17 - Terrapin (Par 3)

The Par 3 17th is the number 4 handicap index hole on the course and is another hole that just does not seem to be accurately displayed on the scorecard distance wise. It says it is 157 Yards from the Silver Tee but with the size of the green, the hole placement could have it from 197 yards up to 240 yards which is a ridiculously major difference than what you are expecting walking up to the tee. You will be using a long iron or more likely a hybrid or wood of some sort on this hole, which combined with the tight line you must play between the trees on a hill on the left and the trees on the right that go into a creek, you will have a challenge to just get it on the green.
The putt is no cakewalk either if you do manage to reach the green in one. Depending on the hole placement, you will have a multi-level green with quite a lot of break in it no matter the direction. Even with the difficult challenge of the hole, it is a very peaceful and secluded hole before you make it to the last hole that gives you one more beautiful view.


Hole #18 - Yona (Par 4)

This is it, the 18th hole is an enjoyable 317 yard Par 4 from the Silver Tee and is the perfect way to end a day that could have gone anywhere from great to somewhat brutal on the scorecard. In the end though, you get one more reminder of what this course is all about, the beautiful Smoky Mountains all around you. The best time to come to this tee in my opinion is right before sunset, the light is just magnificent over the mountains.
You are hitting off of an elevated tee box for this shot and with the short distance you can lay up if you'd like, but why not bring out the big stick for one more drive and try to smash one down there to have an easy pitch up onto the green. It is a slight dogleg left so you will have fairway to work with if you leave it out to the right a little bit. If you take an aggressive line directly over the bunkers on the left you will be left with a slightly awkward, yet doable, pitch shot. Either way, this hole is a fun way to end the day and maybe just maybe you'll be able to walk off with a good score to end your round.


Sequoyah National is Simply a Perfect Place to Spend Some Hours in the Mountains

Ever since I played this course from the first time, I have made a point to come back and play it each time I visit Cherokee and The Smoky Mountains National Park. You will be mentally and physically challenged by the course in this up and down terrain, but you will also be rewarded with some of the most stunning mountain views you can find on the East Coast states of the United States in my opinion. I hope you enjoyed reading my breakdown of this amazing golf course and if you have any questions you can message me through email at www.travelinggibson@gmail.com or on Instagram @travelinggibson. Thank you for your time!


Comments